A Different Football
August, 2003
Kayak builders often build their stripped decks with figured inlays, resulting in expressions of artistry ranging from pure beauty to the garish. Why couldn't a similar artistic approach be taken on a canoe bottom? After using the common herringbone and simple straight line closure of the football area on a couple of my canoes, I decided to try something different. I wanted a pattern for the bottom of a canoe that was reasonably easy to make without being overdone. The design I wound up with was not all that difficult, after the second try. This article describes how it was done.
It must be said that overdoing the design will clash with the overall flowing lines of the canoe. Decorative inlaid designs should complement the rest of the boat and not overwhelm it. Feel free to experiment, but don't make a design that is difficult to build or overdone.
The 15 foot Bob's Special was stripped normally to where both inner stems were covered, leaving the entire football open. The open area was then outlined with border strips consisting of a simple dark/light/dark strip built as described in Making Accent Stripes.
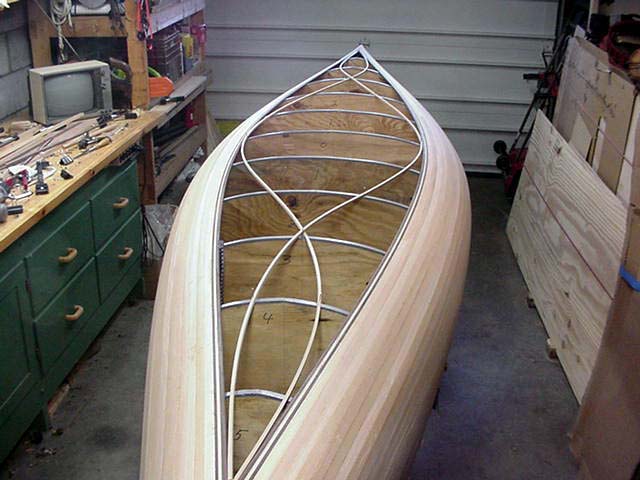 Some 1/4"
square stock cut from leftover strips was tacked on the
forms with small brads to outline the design. Measuring and
adjusting the location from the edge of
the football to the square layout strips in several places insured the design was
symmetrical. A piece of cardboard was laid over one of the curves, and a
tracing was made from below from the stem end to the center of the boat and
back along the edge of the football. This gave a pattern that would be the same for
all four corners, and would later be used to trim the stripping. The forms
were then marked where the layout strips crossed them, and the layout strips
were removed.
Some 1/4"
square stock cut from leftover strips was tacked on the
forms with small brads to outline the design. Measuring and
adjusting the location from the edge of
the football to the square layout strips in several places insured the design was
symmetrical. A piece of cardboard was laid over one of the curves, and a
tracing was made from below from the stem end to the center of the boat and
back along the edge of the football. This gave a pattern that would be the same for
all four corners, and would later be used to trim the stripping. The forms
were then marked where the layout strips crossed them, and the layout strips
were removed.
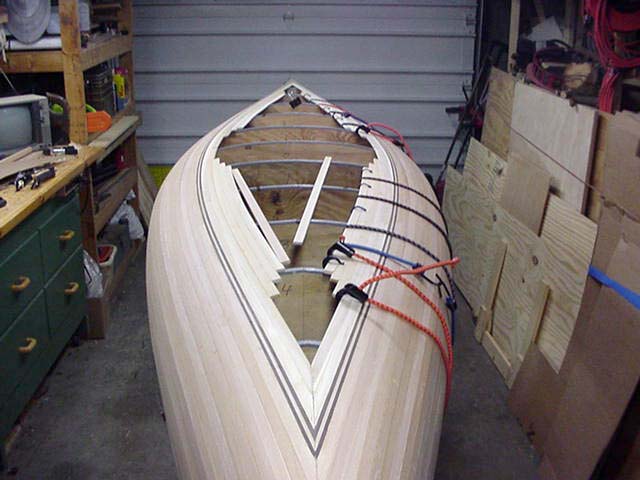
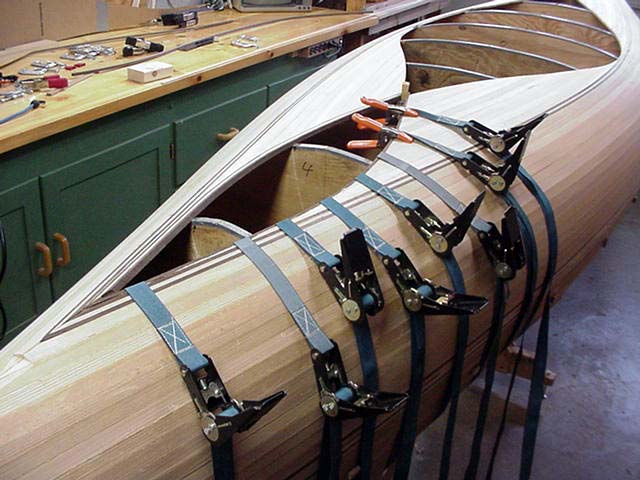
 Northern white cedar
was used to
strip the outer areas, going a bit beyond the marks on the forms.
Bungees and web clamps were used for gluing clamps.
Northern white cedar
was used to
strip the outer areas, going a bit beyond the marks on the forms.
Bungees and web clamps were used for gluing clamps.
 The
cardboard pattern was then laid over the raw strips and traced over all four corners.
The waste was cut off and the edges carefully trimmed
to the line with a curved microplane.
The
cardboard pattern was then laid over the raw strips and traced over all four corners.
The waste was cut off and the edges carefully trimmed
to the line with a curved microplane.
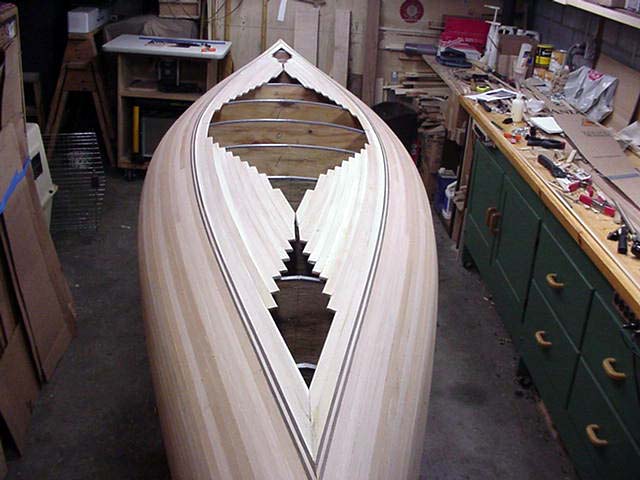
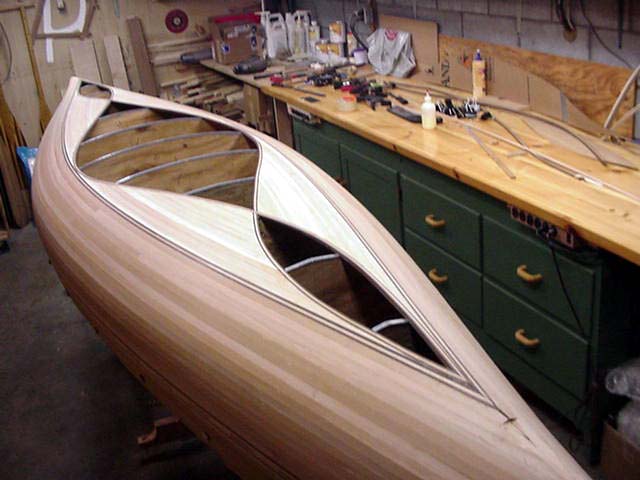
 The
next step was to outline the open areas with a dark/light/dark border, but not
with an accent stripe type of strip. The border was built up from
individual flat pieces
of stock. A 1/8"
thick strip of
Peruvian walnut about 3/8"
wide was first glued all along the edges of the
white cedar, held with web clamps. These were followed by 1/8"
strips of white cedar and
another walnut, both glued in together. This was
done to protect the softer white cedar center from
bungee and web clamp pressure dents.
The
next step was to outline the open areas with a dark/light/dark border, but not
with an accent stripe type of strip. The border was built up from
individual flat pieces
of stock. A 1/8"
thick strip of
Peruvian walnut about 3/8"
wide was first glued all along the edges of the
white cedar, held with web clamps. These were followed by 1/8"
strips of white cedar and
another walnut, both glued in together. This was
done to protect the softer white cedar center from
bungee and web clamp pressure dents.
 The
total width of the border was
3/8".
Note that the border crossed from one side to the other across the gaps.
This has to be taken into account when forming
the white cedar areas.
The
total width of the border was
3/8".
Note that the border crossed from one side to the other across the gaps.
This has to be taken into account when forming
the white cedar areas.
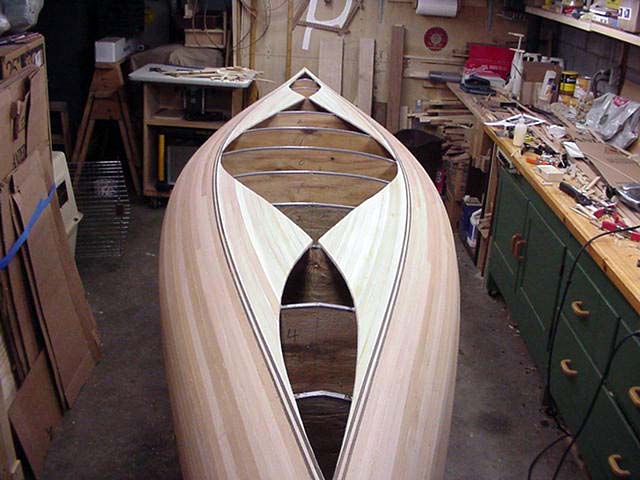
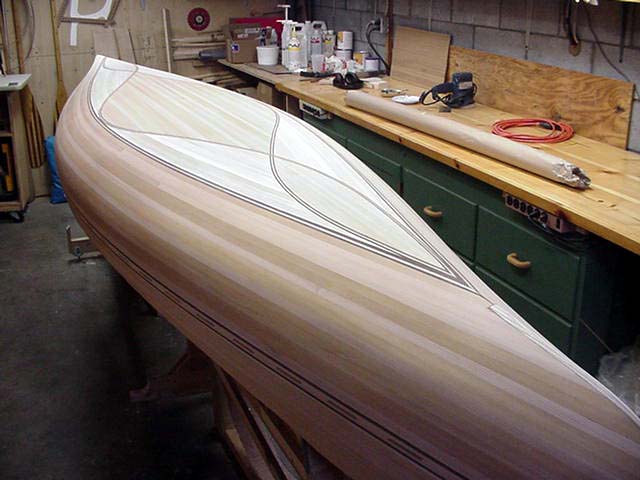 The
rest was simply filling in the curves with normal bead and cove red cedar.
King
plank strips of red cedar were first made with a bead on both
edges and installed down the center of each of the three openings. Stripping against
these center strips made sure the stripping pattern was parallel
to the keel. With all that done came the
filling, sanding, glassing, etc. A sharpened Pro-Prep scraper
with a convex blade worked great getting the border strips smooth and fair, especially inside.
The
rest was simply filling in the curves with normal bead and cove red cedar.
King
plank strips of red cedar were first made with a bead on both
edges and installed down the center of each of the three openings. Stripping against
these center strips made sure the stripping pattern was parallel
to the keel. With all that done came the
filling, sanding, glassing, etc. A sharpened Pro-Prep scraper
with a convex blade worked great getting the border strips smooth and fair, especially inside.
One last thing - I said this was the second try. The first attempt didn't work - I tried it the way some kayak builders have described doing it, by laying in the field strips and cutting the border, then laying in the outline strip into the border cut-out. Since this hull was stapless ( a few nails here and there), it just didn't go the way I wanted it to. I found it a lot easier to build up the inlays as I have described.