Making Accent Stripes
Rev. August, 2003
(Click on the pictures for a larger view)
Making accent stripes which are a little more complex than a single strip that contrasts with the basic hull color is not difficult, but it does take some thought and a little extra time. This section details making a three-part stripe - that is, making three individual strips, that when mounted on the hull, form the finished stripe. The technique can be used to make just about any sort of accent, from simple two or three lines to complex repeating patterns.
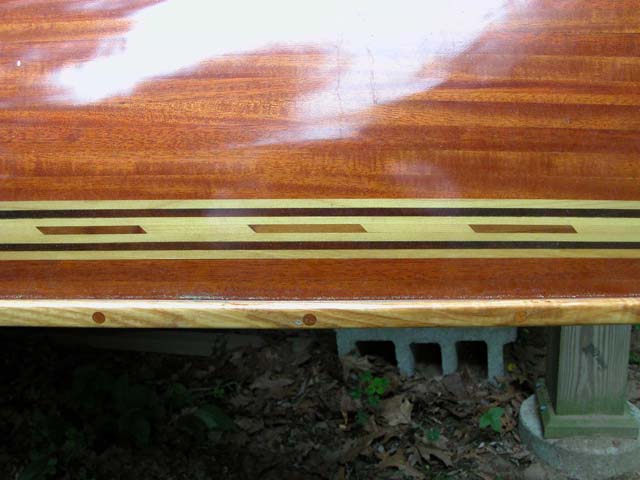
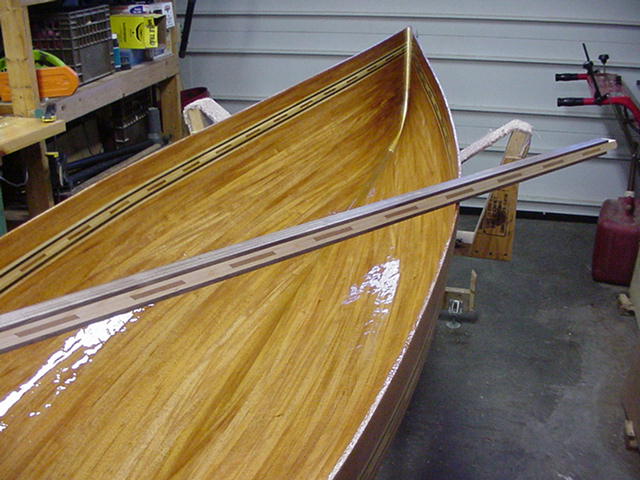
The accent stripes described in Building the Wee Lassie II and shown in a section of the mahogany hull pictured below are made in three parts - the dark/light bottom section, the center portion which is 3/4" wide and made of three layers, and the top dark/light section, made similarly to the bottom one.
The wood I used for the light colors was northern white cedar, which stays quite light in color when epoxied. The dashed line was white cedar and western red cedar cut from a nice dark plank I saved out from strip making. The dark stripes were cut from Peruvian walnut, which turns almost black when epoxied. Ordinary walnut will work almost as well, but may not be quite as dark.
The basic method of making all of the component stripes is to glue up the requisite pieces as a "sandwich", clean up the blank, and slice off the strips. The bead and cove edges are then cut and the strip mounted just like any other strip, usually as the third or fourth strip from the sheer. I first saw the method in Mac McCarthy's Featherweight Boatbuilding book. The method described here has a little more detail.
It is assumed the boat will be built from 1/4" thick strips with bead and cove edges and stripped with the bead edge leading. Because the strips making up the finished accent stripes will also have to be 1/4" thick, and allowing for edge cleanup and slicing, you can't use existing bead and cove strips to make the stripes unless you only take one stripe from each of two blanks. If the strips to be used were 3/4" wide with bead and cove edges, little solid stock for cutting and cleanup would remain. I don't like to do this, since they may not match exactly and two blanks have to be made. If you make the blank wide enough, you can cut two matching stripes from one blank and have enough wood to plane them to exact thickness. I thickness plane the blank to get a good surface, then slice the stripes off a little thick and plane them to 1/4".
Making the Required Stock
The first thing to make is enough light and dark colored strips for the full length of the boat + 1 foot. White cedar planks are not that long, so I scarfed enough together to get the required length, and did the same for the dark stripes (walnut). Make these raw strips about 7/8" wide, and thick enough to plane down to 1/4". You also need some pieces 3/8" thick - you will lose 1/8" on the bead edge of the finished strip, since it will be covered by the cove of the next strip.
The following represents each component, in the orientation it will be mounted on the hull, bead edge up.
1. 3/8" thick strip of planed light colored wood, to later receive a beaded edge when sliced off the blank.
2. 1/4" thick dark strip, cut a little thick and planed to 1/4". This piece will be glued to the preceding one, and receive the cove edge when sliced from the blank.
3. 3/8" thick strip of planed light colored wood, to have a later beaded edge when sliced off the sandwich
4. To make the dashed line center stripe, you have to cut a number of dark and light blocks. I cut a 45-degree bevel on the ends, and make them 31/4" long over all. When assembled, there are two light blocks and two dark per foot. Note that cedar splinters like crazy when cross cut if they are not backed up during the cut. You will need 1/4" thick blocks of dark red cedar and white cedar, again cut a little thick to allow for cleanup and to get a perfectly flat surface for the strip (3) above. One side should be planed. Why, later…
 Cu
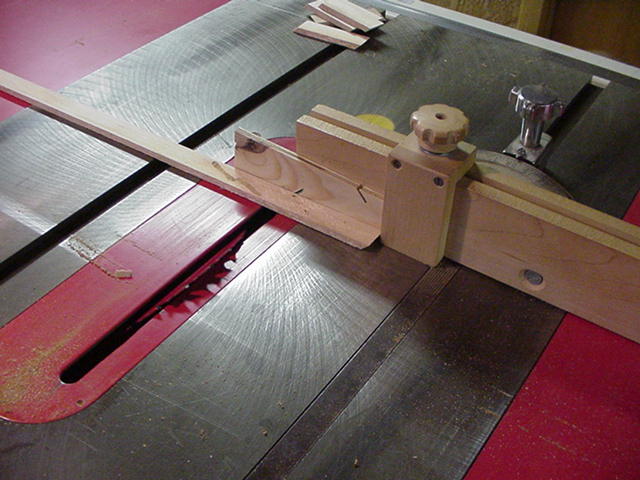
The picture shows a block about
to be cut, with the mitered end against a stop on the miter gage. The blade
is tilted 45 degrees, and is a 71/4"
Freud Diablo thin kerf blade. Avoiding splintering is important to get
a finished stripe with no voids.
Cu
The picture shows a block about
to be cut, with the mitered end against a stop on the miter gage. The blade
is tilted 45 degrees, and is a 71/4"
Freud Diablo thin kerf blade. Avoiding splintering is important to get
a finished stripe with no voids.
5. light bottom strip, cut oversize and planed to 1/4" thick.
6. 3/8" thick strip of planed dark wood, to have a later beaded edge.
7. 1/4" thick light strip, cut a little thick and planed to 1/4".
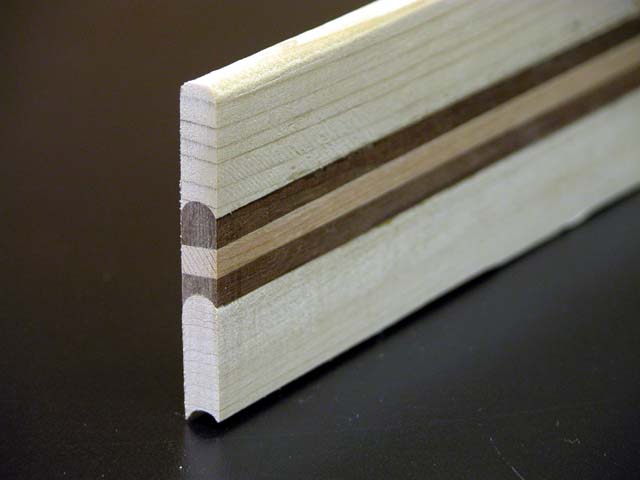
A three-line accent stripe. Note the top dark stripe is visible as 1/4" high, but the stock is 3/8" to accommodate the bead.
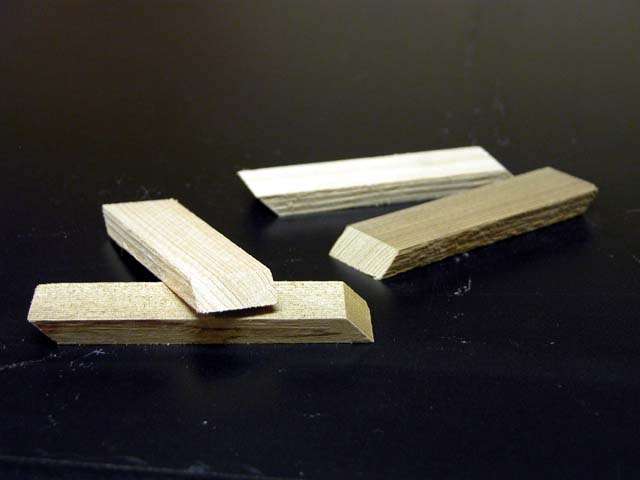
The sandwich filler blocks, cut from planed stock a bit thicker than 1/4".
Assembly:
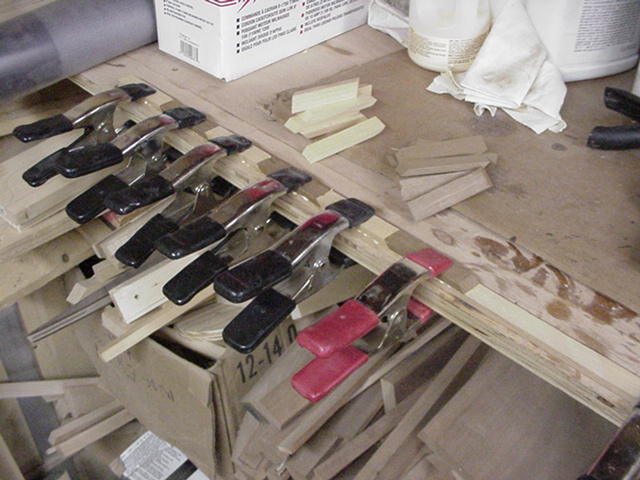
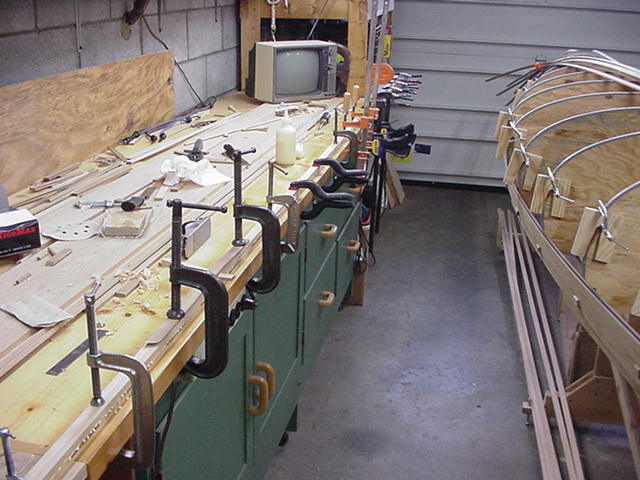
You will need bench space as long as the final length of the stripes. If you don't have your forms mounted on your strongback, you could lay a temporary extension off one side and the end, wide enough and long enough to allow clamping with spring clamps (see the pictures). You will need a good handful of 2" spring clamps - 8 or 10 are enough - and every C clamp in the neighborhood.
As for glue, use the same glue you will be using to glue the strips on the hull. Don't bother with epoxy - it's overkill, expensive, and messy. Titebond or Titebond-II works great.
First, make the dark/light strips. On the planing - a planed surface allows for perfect contact of the glued up components. You will have consistent glue lines without voids, and alignment is easier. The finished product has no gaps, and looks like it grew that way.
Lay a 3/8" thick dark or light strip on the bench and spread glue its entire length, being careful to completely cover the entire surface. I pour some glue into a plastic cup, like used for mixing small batches of epoxy, or like the one that comes on bottles of cold medicine. I immediately spread it with a 1/2" paintbrush. I suppose you could pour it directly out of the bottle, but on Titebond, the mouth is too wide for good control, and squeezing it out through the tip is much too difficult. However you do it, do it quickly and cover the entire surface, but don't over do it. Immediately lay the other 1/4" thick contrasting strip over the first, and clamp it down to the bench. Don't use a lot of pressure, only enough to assure good alignment and get some squeeze out. Over tightening the clamps can starve the joint, and you don't need it to come apart when you are routing it or gluing the finished strip on the hull. Getting some squeeze out assures you of having sufficient glue to make the bond. Try to get the edges perfectly aligned flush.
You can "stretch" your C clamps by using a scrap strip between two adjacent C clamps, with a 1/4" piece of scrap between the scrap strip and the work. You can see such a set up in one of the pictures. Make the other dark/light blank the same way. Note that one of the blanks should have a 3/8" thick light strip; the other should have a 3/8" thick dark strip. Clean up the glue squeeze out the next day, and follow the same planing and cutting procedure described below for the center stripes.
Now lay a 1/4" strip of light colored wood on the bench, with a planed surface up. Spread glue on a planed surface of a filler block and lay it on the end of the first strip such that the bevel on the free end faces up to make gluing the next one easier. Clamp it down with a spring clamp. When you release your hand from the clamp, it may reposition itself and slide the block. Since the clamp is now where it wants to be relative to the bench and work piece, gently squeeze the clamp only enough to allow repositioning of the block without moving the clamp, then again release it. The edges of the block should be perfectly aligned with the edges of the base piece. This is important, since it keeps the cut ends square with the base piece and prevents alignment errors from compounding, leading to gaps in the finished stripe.
Gluing and clamping the filler blocks.
Now spread glue on a contrasting block, including the bevel end, and glue it down as before. Make sure you get a good tight joint at the bevel, but don't over do it. You don't want the block to slide up the bevel. Continue gluing alternating dark and light blocks. When you run out of spring clamps, it will be OK to remove the first one and use it for the next block. You can "walk" down the entire blank this way, using only 8 or 10 clamps. Don't forget to get a little squeeze out at each block, including the bevels.
Let
the assembly dry at least over night before attempting any further work.
Take all the clamps off, and scrape off the squeeze out from the top.
Don't worry about the edges yet. Now very carefully loosen the blank from
the bench (it may be stuck here and there from excess glue), and thickness plane
the surface with the blocks on it. Recall that you made the blocks a little thicker than
1/4"
- that's why. This removes any residual squeeze out and gives a perfectly flat clean surface
for the top strip. Handle it carefully and don't allow it
bend excessively - the end grain joints on the bevels are not real strong.
In planing the blank thus far, you have a 1/4"
thick base strip, and want the dashed line to also be 1/4"
thick.
Now glue the 3/8"+ light colored strip on top, using the same technique as you did when you made the dark/light strips.
Gluing the top strip on to the blank. Note the C-clamp "stretcher between the two big clamps.
Let the whole thing cure overnight before removing the clamps. Clean up the glue with a sharpened paint scraper. Using a block plane, carefully hand plane just enough of the edge of the blanks to get a reference surface. You can then plane the other edge with the planer to get a perfect reference edge, or just go with a good and careful hand planing. I imagine a jointer would also work for this. This is the surface that goes against the fence of the table saw. Now cut two final strips from each of the three blanks you made. Again, I like to cut them a little fat and plane the saw marks off, to a final thickness of 1/4". Accurate thickness throughout allows perfectly centered bead and coves to be cut. The finished dashed line blank should look something like the paddle shaft blank built similarly for the Wee Lassie-II.
Caution! When routing the bead and cove edges, make sure the beads go on the thick (3/8") edges!
That's all there is to it. It is really not that difficult, but attention to detail is important to get good tight fitting joints. I tend to be a perfectionist, (read: twit) and insist on taking my time and doing my best. You may want to try doing a short 3 or 4 foot piece to get the hang of it before committing to the real thing.