If you have never done it, the most daunting job in building a boat can be that first time you put on fiberglass. Horror stories abound, like wrinkles, bubbles, epoxy that never cures, etc. I have done more than a few boats, and have yet to have a problem that I couldn't solve or did not understand why I had the problem in the first place.
There are about as many ways of applying fiberglass as there are boat builders - just ask one. What I describe below is what works for me, in my shop. Before getting started, I must say I use MAS epoxy exclusively. It just happens to be what was supplied when I bought the makings of my first boat, in a kit. I am comfortable using it, it does a great job, and problems have been minimal. For a lot of good information on MAS epoxy, see the technical info/FAQ section at their web site http://www.masepoxies.com. An excellent web page that describes extensive testing of several brands of epoxy is http://www.oneoceankayaks.com/Epoxtest.htm. This web site also has a lot of other good information.
Caution: The times for curing, mix ratios, and general epoxy characteristics discussed in this article are specifically for MAS epoxy as used in my indoor shop under normal indoor environmental conditions. Applying these values and conditions to other brands of epoxy is done at you own risk. If in doubt, experiment to find the best conditions suited to your application.
Buying Epoxy and Fiberglass
First, buy your epoxy and fiberglass from the same vendor, preferably one whose primary reason for being in business is building strip boats and supplying boat builders. A vendor who sells only epoxy or only fiberglass, and does not use them in his normal business, cannot be relied upon to answer your questions. A supplier who also builds boats professionally is infinitely better equipped to be a reliable source of not only products, but information.
The first rule for buying fiberglass is to insist that it be supplied on a rolled cardboard tube and shipped in a cardboard box. Paying a few bucks extra for such packaging will pay off in the long run. Fiberglass cloth is a simple weave, and the strands are quite slippery against one another. It is easily distorted when handled improperly or excessively. The strands are normally at right angles to each other, and must be kept that way. Folding the cloth for packing and shipment can easily distort it, leading to pulls, gathers, lumps, and distortions when it is epoxied.
From time to time I see discussions about the relative merits of "s" glass and "e" glass, and different weaves. I never bothered to learn the difference. Apparently, some advanced builders (or chronic worriers) prefer one or the other, there being some slight difference in them. There is also agonizing over laying on multiple layers, four ounce vs. six ounce cloth, and on and on...... I rely on my supplier to send me what I need. A quick phone call or email, and a few days later I have enough of the correct type and weight of fiberglass for the boat I am currently working on. Professionals might see it entirely differently, but I found it to be stress free and easy. A reputable supplier is required, of course.
Handling Fiberglass Cloth
When you receive it, only open it enough to verify it is what you ordered. Don't unroll it. If it is from a reputable supplier who you can trust, don't even open it until you are ready to use it. When the day comes that it is time for the glass, put on a pair of latex gloves and carefully open the box. Never handle fiberglass cloth barehanded. This is not to protect your hands, but to protect the cloth. Any little bits of rough or calloused skin on your hands can easily cause pulls and gathers in the cloth, which can cause problems later on.
With the outside of the hull sanded, vacuumed, and perhaps wiped down the day before with a damp (NOT wet) clean cloth and allowed to dry overnight, carefully unroll the cloth over it. DON'T wipe the hull down with a tack cloth or acetone - any contamination can effect the curing; in fact, acetone is a solvent for mixed epoxy and will soften cured epoxy. It is very helpful to have an assistant at this point. Don't pull the cloth – if you have to get more cloth to the end on the hull, roll it back up, move it to position, and then unroll it. Keep it centered over the hull and going straight, and keep the strands at right angles. Don't try to get it to lay flat and tight just yet - you are simply measuring it out here. When you have enough unrolled to get to the other end, have your assistant cut it from the roll in a straight line across its width. Immediately replace the wrapping paper it came in, and safely stow the remaining cloth in the box.
Resist the temptation to run your gloved hand over the cloth. Use a wallpaper smoothing brush to smooth out the cloth, sweeping from the keel to the sheer, and make sure that the longitudinal strands run straight and parallel with the keel and the transverse strands run at right angles to the keel. If you have to shift the cloth, lift it as much as possible before pulling on it, and do it carefully. Again use the brush to smooth it, and make sure of the orientation of the strands. If the strands are not running parallel and across the boat, you stand a real good chance of having wrinkles and gathers at the sheer. To remove any pulls, where the strands in a small localized area are all distorted from a straight line, brush the area back and forth rapidly with a stiff clean dry brush. The corner of the wallpaper smoother brush can also be used. The opposite of a pull is a gather, where the strands all bunch up tightly. If left there when the epoxy is applied, you will get a lump that does not lie flat, and will wind up getting sanded off. Not pretty. These are a bit more difficult to remove. Use your finger tips to try to spread the strands out to a normal configuration. You may have to tug on the edge of the cloth, but just at the strands that are affected.
Cutting to Size
 With
the cloth all smoothed and covering the entire hull, trim the edges to within
an inch or two of the sheer. At the ends, hold the cloth against the
boat with one hand and trim with the other, again leaving an inch or two of
over overhang past the stems. To trim the stem areas, hold it up so that
it lays against the hull and trim it down to near the bottom of the
stem. At this point, some builders leave the cloth “rest” overnight
before the wet out. I have never found this to have any detectable
effect.
With
the cloth all smoothed and covering the entire hull, trim the edges to within
an inch or two of the sheer. At the ends, hold the cloth against the
boat with one hand and trim with the other, again leaving an inch or two of
over overhang past the stems. To trim the stem areas, hold it up so that
it lays against the hull and trim it down to near the bottom of the
stem. At this point, some builders leave the cloth “rest” overnight
before the wet out. I have never found this to have any detectable
effect.
Getting Ready
Now gather up the tools you will need for the wet out. Epoxy, hardener, a few squeegees, disposable 2" bristle brushes, mixing cups and stirring sticks (wood strips about a half inch wide and 1/16" thick are ideal), latex gloves, at least Tyvek sleeves, but a Tyvek suit is highly recommended. You will be standing beside the hull and reaching over it (and later into it) to the keel area to spread epoxy. The chances of getting your arm wet are very good. Also in reaching to the keel, you may get the front of your shirt wet. The Tyvek suits are really inexpensive, much less than the price of a new shirt. Don't forget some paper towels, and have the jugs and dispensing area free of clutter and the surface covered with cardboard.
Epoxy will drip, and newspaper is easily soaked with the uncured epoxy that later glues the paper to the floor. Cover the floor under the boat with cardboard.
The shop environment must also be considered. It should be comfortable and within the range of curing temperatures and humidity recommended by the epoxy manufacturer. There is a (mistaken?) consensus to have the shop warm to begin with, and let the temperature cool down as you are doing the wet out. I have heated the shop, secured the extra heat, and then did the wet out as the shop cooled, and I have also done it with no additional heat or temperature control. I had no problems either way. More about this later.
Measuring and Mixing Epoxy
To be successful using epoxy, both the resin and the hardener must be measured accurately. Any deviation from the exact ratio defined by the manufacturer will lead to another horror story. There is no solvent in epoxy, and it cannot be diluted - all of the hardener reacts with all of the resin to form the hard cure. MAS epoxy requires a 2 to 1 ratio of resin to hardener. For every two volumes of resin, one volume of hardener must be mixed with it. The usual way of measuring epoxy is by using the pumps sold along with the epoxy. These pumps are calibrated to deliver accurate volumes of both the resin and hardener - until they start to burp. For some reason, probably internal wear, after the pump delivers its volume it draws an air bubble into the pumping chamber during the return stroke. During the next delivery cycle, the pump suddenly "burps" the bubble, resulting in an inaccurate delivered volume. What ratio was finally delivered?
Another common error in measuring is counting the number of pump strokes. To make a six ounce batch, you would want four ounces of resin and two ounces of hardener. Since the MAS hardener pump only delivers half the amount of a resin pump, four strokes of resin and four strokes of hardener are required. Right in the middle of pumping, you get a phone call, the dog chases the cat up under the boat, or the UPS guy is ringing the doorbell. Even lesser distractions have caused miscounting of pump strokes. Epoxy that never hardens can result. That means scraping and removing the partially cured mess and starting over. If the mistake was on a wet out coat, I don't even want to think about it......
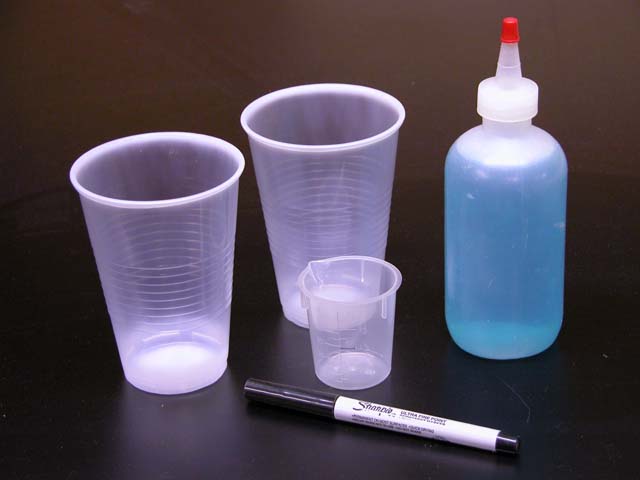
Pouring resin and hardener is not the way to measure epoxy. The pumps work, but are better used for dispensing only rather than dispensing a measured amount. I use a simple calibrated plastic beer cup that is easily made and reusable. Here's how to make one:
First, I want to thank Ross Leidy for this idea. My method is a little different, but it was Ross who came up with the general method.
You will need a package of plastic beer cups (about 10 or 12 ounce size), a fine point permanent marker such as the fine point Sharpie, and a means of accurately measuring small volumes. The beer cups should be the kind that are translucent so you can see the liquid inside. The colored plastic beer cups won't work. You will also need something to measure out one ounce of liquid. Epoxy dealers sell a variety of calibrated plastic beakers; the 50 ml. size (about 2 ounces) is ideal. You will also need some way of accurately filling the little beaker with water to the one ounce mark. You can pour most of it in, but use a syringe or a plastic spray bottle to bring the level exactly up to the mark. If you use the beaker with graduation marks embossed right on the plastic, use the fine point marker to mark the outside at the one ounce mark. The embossed marking is tough to see when it has liquid in it.
Now, put one empty beer cup into a second one. Measure one ounce of water in the small beaker, and pour it all into the inside cup. With the assembly sitting on a level table, make a mark on the outside cup at the level of the water in the inside cup. Add another ounce, and make another mark. Repeat this until you have added six ounces. Remove the inner cup, and mark the outer cup with 1, 2, etc. up to 6, starting at the first mark near the bottom, for the respective calibration marks. Done.
The glue bottle has water in it for filling the 1 oz. beaker. (I colored the water so it could be seen in the pictures.)
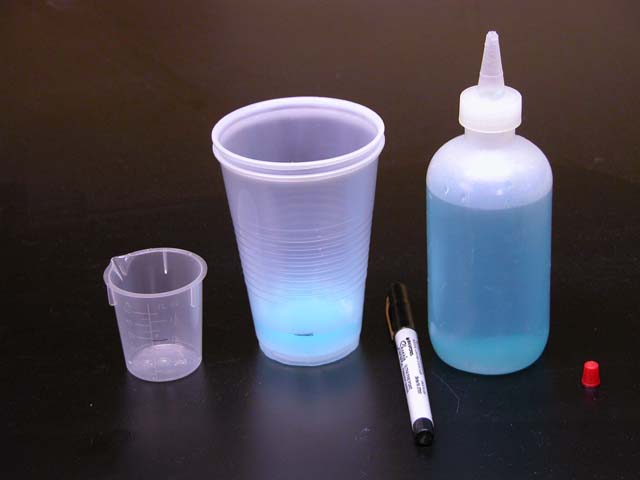
One inside the other, the first ounce added and the level marked.
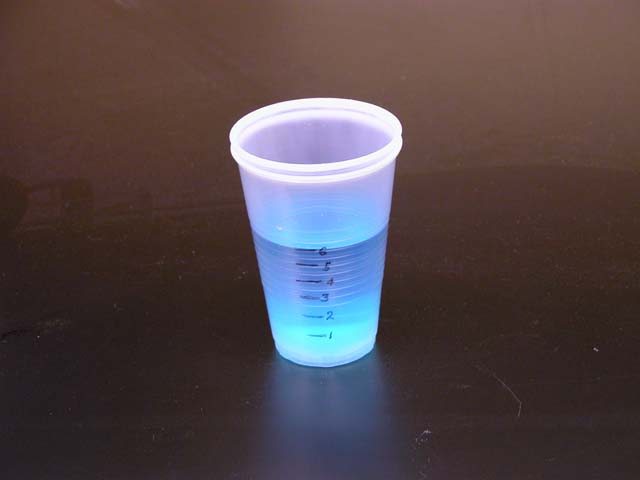
Calibration done.
When you measure epoxy, put a clean new cup into the calibrated cup, and pump enough resin into it (burps and all) to reach the desired mark. It may take me six or seven pump strokes to get my four ounces of resin in the cup, but I know exactly how much resin I have, in spite of the burps. Now add the required amount of hardener the same way.
Mix it up
Mixing epoxy is another area where strict adherence to manufacturers' guidelines is required. It must be mixed, mixed well, mixed some more, and then some. Using a mixing stick described earlier, mix vigorously in one direction for a while, then scrape the sides and bottom of the cup, and vigorously mix some more in the opposite direction. Do this several times, so that the total mixing time is a good two minutes - a real two minutes.
When the time is up the epoxy is mixed, and full of bubbles. Horrors!! The batch is ruined! Nonsense. Bubbles in a freshly mixed batch of MAS epoxy are normal, and they will quickly dissipate when the batch is used on the hull. Another one of the myths in working with epoxy is to mix slowly to prevent the generation of bubbles. Can you say ... uncured epoxy?
Ready, Get Set,....
The cloth is ready, the epoxy is about to be measured and mixed. How will you do the wet out? Do you use a brush, a squeegee, or a roller? The answer is yes. Yes, you can use them all. The squeegee is used to spread the epoxy over the broad areas of the hull, and to move or spread the excess around. Notice I didn't say "remove the excess". The brush is used to get at areas where the squeegee is less favorable to use, like around the stems, and for pressing down wet cloth here and there, like along the sheer or at the stem ends. Speaking of stems, don't try to fold one end of the cloth around to the other side of the boat. You will spend the better part of the day trying to get it to lay flat, largely without success. It's a lot cleaner to just let it run flat off the end of the hull, and be trimmed along the stem later on. The wood at the extreme outside of the stems will be covered with epoxy naturally anyway, and you will probably put a stem band over it. If desired, a strip of bias cut cloth works great for encapsulating stems with no brass stem band. I'll get to rollers and bias cloth a little later.
MAS epoxy consists of the resin, and two hardeners - slow and fast. They sell other variations for special conditions, but for general use, some fast hardener along with the slow is all I have ever needed. MAS epoxy, when mixed with slow hardener, does not blush. Blush is a waxy coating that forms on the surface of some brands of epoxy, and must be completely removed by washing and rinsing before applying the next coat. Using an epoxy that blushes is comparable to watching a black and white TV with a rabbit ears antenna instead of cable. There are better products. When mixed with slow hardener with up to about 25% fast added (always maintaining the 2:1 ratio), MAS still doesn't blush. The fast hardener does blush, but I only used straight fast once, for a quick glue-up.
 While applying it, it kicked off in the mixing cup, got so hot I couldn't hold
it, then generated fumes, and finally melted the plastic cup.
While applying it, it kicked off in the mixing cup, got so hot I couldn't hold
it, then generated fumes, and finally melted the plastic cup.
The MAS slow hardener is just what it says it is - slow. It is a very
comfortable epoxy for the novice, since there is plenty of time to apply a full
six ounce batch without the danger of it starting to cure before you are ready
for it to do so. This is the ideal situation for wet out, since you want a
good penetration of the wood before it cures, providing a deep bond of the cloth
to the hull.
What About Precoating?
Precoating is the application of epoxy to the bare wood hull without any fiberglass. Ostensibly, it "....seals the pores, prevents out gassing...". A few boats ago I had some water heating in a long narrow pan, getting ready to hot soak some ash for a stem. Just before the water boiled, I held a piece of western red cedar in the hot water and observed the surface. After a minute or so, I saw a few very tiny bubbles. The end grain had more, but still not enough to ever cause problems while fiberglassing. Now, it is often stated, and mistakenly so, that the heat generated by curing epoxy expands the air in the wood pores, causing bubbles under the fiberglass. From my little unscientific test, if the epoxy got hot enough to cause out gassing from the pores, I wouldn't be able to hold on to the mixing cup. The heat would have to be tremendous, and the mixing cup would probably melt, if not flat out burn.
Many builders, professionals among them, advise to heat the shop, and then do the wet out and even the fill coats, as the temperature falls. If the reduction in air volume due to cooling even several degrees was enough to suck epoxy into the voids, the mere act of breathing in the resulting vacuum in the shop would be impossible.
Bubbles do occur, but they are not out gassing from the pores. In all of the cases that I have critically examined, bubbles ranging in size from pin head to the size of a nickel all came from between the strips. If the strips are not properly and tightly glued, there will be gaps that can be hidden from casual view and slightly exposed during sanding. It doesn't take any more than a tiny hole into a larger hidden cavity to cause problems. During wet out, the extremely low viscosity epoxy settles into the holes, gaps, and cracks, displacing the air. The air is forced out, but cannot escape because of the wet fiberglass over it. Bubbles result. Precoating may help prevent some bubbles, but if the strip glue-up was less than that demanded by good craftsmanship, there can, and probably will, still be some bubbles.
Another source of bubbles is the air entrained in the cloth that is not squeegeed out during wet out. These are tiny and occur rather randomly, not being associated with any cracks or gaps
Back to precoating - Every time the topic is raised on the forums, there are a host of responses and reasons for and against. In an effort to find out the truth, I contacted MAS and asked about precoating. Their reply was that precoating is technically not required until you get up to the heavy weight fiberglass cloth, like 10 or 12 ounce, and that for amateur canoe or kayak building precoating is a matter of personal preference. I personally prefer not to precoat - it costs a coat of epoxy, adds more weight, the fiberglass doesn't really contact the wood, it takes an extra day, and I can still get bubbles (and actually did once). Getting rid of bubbles is discussed later.
You will be applying a wet out coat, and three or four fill coats. In order for one coat to chemically bond to the previous coat, the previous coat cannot be fully cured when the next coat is applied. If you precoat, you must wait a sufficient length of time for the epoxy to get hard enough so that the cloth, when it is laid out, will not stick to it, but yet soft enough so that a chemical bond is possible. If the precoat has cured hard, it will not yield a good chemical bond and should be sanded. This is true with any coat - if your fingernail will dent the surface, no sanding is necessary. If it is hard and no dent is seen, break out the sander. But precoats are thin, and sanding can easily go through to the bare wood. If you ignore it and then wet out the glass, you will have a hull with mottled light and dark areas, depending on where you cut through. Recoating the sanded through areas is just more work, more epoxy, more waiting during which time the rest of the job has cured to the sanding point,..... Need any more reasons to forget about precoating?
Timing is Everything
Consider the above discussion about chemical bonding vs. mechanical bonding on a sanded surface. Depending on the curing requirements and characteristics of your epoxy, it is strongly recommended you have enough time available to follow through to the last coat. Say you did the wet out. The hull is glassed, but rough, and requires a few more coats to fill the weave. If you don't have sufficient time to add a few fill coats at the proper time, you will wind up with a need to sand the wet out coat. But that coat is extremely rough, and any sanding will cut the glass.
Using MAS epoxy with slow hardener, and with the shop at a comfy 65 to 70°F and nominal humidity, I can wet out one day and fill the next. I do a fill coat using 25% fast hardener and 75% slow first thing in the morning, and do another coat in the late afternoon. Same for the next day, for a total of four fill coats.
Getting to know your epoxy is important for assuring success, but what if you have never done it before? Using a piece of plywood and some of the scrap trimmed fiberglass, mix a small batch of epoxy and do a wet out. See how long it takes for the epoxy to "kick off" (begin to gel), how long it takes for it to get cured enough to do a fill coat, and generally learn how to measure, mix, and handle it. The time and materials invested could mean the difference between a nice boat and a mess.
Go For It !!
With everything ready and time allotted, mix 6 ounces of epoxy using the calibrated cups. With MAS, I use four ounces of resin and two ounces of slow hardener, which gives me plenty of time to do the whole job and get a good soak-in under the glass. Remove the inner cup from the outer calibration cup - this keeps the calibration cup clean for the next batch. Pour a small puddle of epoxy on the hull near one end, behind the end of the stem. Spread it around with a squeegee, but don't press hard - you just want to spread it, and you don't want to drag the cloth. Work towards the stem. When you get to the steep side, you may want to use a brush in addition to the squeegee. Be careful to not let it run off the hull. Wet the cloth out all the way to the stem, on both sides of the hull. Don't bother to create a problem by trying to wrap the cloth around the end of the stem.
When the batch is all on, use the brush to completely empty the cup and wipe the cup off with a paper towel. Alternatively, you can discard the cup and use a new one to mix the next batch. If you use the same cup, make sure it is completely empty or the next batch will not be accurately measured.
With the cloth wet down on one end, work towards the other end. It will go fast along the main part of the hull. From time to time, like between batches, look closely at the sections you have just done. Make sure there are no whitish looking areas, indicating that the epoxy has soaked deeply into the wood and starved the cloth. Add more epoxy to these spots.
After applying a few batches, you can start the squeegeeing (what a word!!) process. The object of squeegeeing is to make sure the glass is pressed down firmly against the wood, and redistribute any excess epoxy. Hold the squeegee at a little higher angle and press a little bit more than when you are just spreading, but don't press hard enough to scrape epoxy out of the glass. With some epoxies, I am told, the foamy stuff that results should be removed and discarded. MAS has told me that all of their product can be used, even if foamy. I have taken them at their word and merely spread excess epoxy to dry areas. By the time it had gelled, the foam was clear. With a faster curing brand of epoxy, this may not be the case.
When the hull is completely wet out and squeegeed, go around it from time to time and look for any drools and runs. You should not see any on a wet out coat, but if you do, use the squeegee to spread the runs out. After a few hours, it will no longer be necessary. Check for any bubbles or where the glass may have pulled away from the stem or sheer. While the epoxy is still sticky, you can work out the defects with a squeegee. Press them down, and try to get the cloth to stick. If you have bubbles, attack them as soon as they are spotted - the more liquid the epoxy still is at this point, the easier it is to press them out. If you have a particularly ornery bubble, try slitting it along its edge, being careful not to cut into the wood. Work some epoxy into the slit to get the air out, and press the flap down. If you cut into the wood, it will leave a scratch mark under the glass.
Now for some clean up
To remove the latex gloves, grab one at the cuff with your thumb and index finger and peel it off inside out. Then do the other one. Don't turn them right side out yet - there is uncured epoxy on the inside. If you want to use them over again, wait until the epoxy is cured, like the next day, before turning them right side out. Latex gloves usually have talcum powder inside them for ease in putting them on. You lose this slipperiness when you try to re-use them, but if you dip your hands in the sawdust bin before trying to put them on, it works almost as well as the talc.
To clean up any uncured epoxy, white vinegar works well. The epoxy hardener is an amine, which is alkaline. Wiping it with the vinegar, which is an acid, neutralizes it. In any event, use waterless hand cleaner to clean your hands when you are ready to quit. NEVER use a solvent on your skin!! It dilutes the epoxy and allows it to rapidly soak into your skin. The potential for contact dermatitis is real, and chronic exposure can be downright dangerous.
Now, Fill 'er Up...
 With
MAS epoxy mixed with the slow hardener, let the wet out cure overnight. It
will still be slightly soft in the morning, but this is the ideal time to trim
along the sheer and stems and add a fill coat. Cut off the overhanging
cloth flush with the sheer and along the stems with a sharp utility knife.
Don't run your hand over the freshly cut area - fiberglass cloth with hardened
epoxy on it can be quite sharp. With the trimming complete, you are ready
for the fill coats. For these you can use a roller, with a 2" bristle
brush here and there. The roller covers are half of a standard 9"
cover. The nap is very short (mohair?), and can be obtained from your
epoxy supplier. I have bought roller covers in the big box stores - they
are labeled for epoxy, along with other stuff. Cut them in half (band saw
works great) and mount a section on a short roller frame. Don't bother
with the usual paint tray - you don't need it.
With
MAS epoxy mixed with the slow hardener, let the wet out cure overnight. It
will still be slightly soft in the morning, but this is the ideal time to trim
along the sheer and stems and add a fill coat. Cut off the overhanging
cloth flush with the sheer and along the stems with a sharp utility knife.
Don't run your hand over the freshly cut area - fiberglass cloth with hardened
epoxy on it can be quite sharp. With the trimming complete, you are ready
for the fill coats. For these you can use a roller, with a 2" bristle
brush here and there. The roller covers are half of a standard 9"
cover. The nap is very short (mohair?), and can be obtained from your
epoxy supplier. I have bought roller covers in the big box stores - they
are labeled for epoxy, along with other stuff. Cut them in half (band saw
works great) and mount a section on a short roller frame. Don't bother
with the usual paint tray - you don't need it.
For filling, I like to speed up the curing a bit by using some fast hardener along with the basic slow. Mix four ounces of resin with one and one-half ounces of slow hardener and a half ounce of fast. If your pumps are working burp-free, this is four pump shots of resin, three shots of slow hardener, and one shot of fast. Mix it for a full two minutes, as described previously. If your pumps are burping, you can use the calibrated beer cup for measuring.
Pour a puddle on the hull near one end, and have at it with the roller. The first puddle will probably mostly be soaked up by the roller. Spread it around, using a painting stroke much like painting that bedroom the wife has been after you to do. (Rolling on epoxy is practice for painting the room, right?). Try for an even coat, and don't get it too thick. You won't fill the weave on the first coat - don't even bother to try. Also don't worry about the foamy stuff - by the time the epoxy gels, the bubbles will be gone.
When you have rolled on the first six ounce batch, go over the entire area with a dry brush, tipping off any remaining bubbles and dragging up any drool. Don't try for a varnish-like finish - just keep the epoxy on the boat and not on the floor. You won't get all the bubbles, but they will soon go away. If a lot of runs start to develop, you rolled it on too thick. Roll on the next batches, alternating between rolling on a coat and tipping off. You can drag the brush over areas already brushed when chasing runs. The brush marks will level off in a few minutes. I go over the whole boat with a dry brush periodically throughout the day until there are no more runs to drag up. Let it cure until late afternoon or evening, and do another coat. By this time, you should be quite comfortable mixing and handling epoxy. Repeat the whole process the next day, and the filling will be done.
Most books say that about three coats over the wet out coat are enough to fill the weave. This is fairly true, but what comes next? After the epoxy is fully cured, you will be scraping and sanding, removing what amounts to a full coat. Exposing the weave of the cloth here is a distinct probability. You are now faced with the decision of whether to add another coat (recommended if a lot of glass is showing) or ignoring the problem and going with the varnish. If you choose to add another coat, the whole hull will have to be sanded first. Then the epoxy is rolled on, after which there is the few more days to final cure before starting over with the sanding. Varnishing over the exposed glass covers it nicely - until you take the boat out in the sun. Those spots that you ignored in the shop and let the varnish cover tend to show up when in direct sunlight. Having been through all this a few times, I now routinely roll on four fill coats, and never have to see any exposed glass. I save the time and frustration right off the bat.
Sanding and Scraping
Before taking the boat off the form, it is a good idea to do the preliminary surface preparation in anticipation of varnishing. If there are any runs, I use a cabinet scraper to take them down before sanding. Scraping is easiest when the epoxy is still "green", that is, soft enough to be dented by a fingernail, and not cured hard enough to sand. In my shop, this optimum time for scraping is about two or three days after the final coat. Sanding is not done until a few days after that. With the new formulation of MAS that resists drool, and using the dry brush to hit runs before they cure, there are few runs and very little scraping is required. If you do have runs, use the scraper to remove them. Trying to sand out runs with the RO sander will only expose the weave of the cloth, since it is impossible to keep the surface of the sander only on the run and not touch the surrounding area. You don't have to scrape the surface fully down to a dull scraped sheen, just remove the high spots and let the sander do the rest later.
If you notice any cloudy area developing as you scrape or sand, stop. The epoxy is still too soft, and you are smearing it. Scraping and sanding generate heat, heat softens the epoxy, and it will smear. If you are sanding, the softened stuff will plug the sandpaper, causing more heat, more smearing, yada, yada.... That cloudy stuff will not go away if you add more epoxy, and it will show up under varnish. The fix is to let it cure hard, then scrape and sand it off. It may take off enough epoxy to require adding some back on.
I do a rough sanding with the random orbit sander and 80 grit, with the sander hooked up to the shop vac. Sanding epoxy is a very dusty and potentially toxic proposition, and some form of dust collection is an absolute necessity. If there is no way to collect the dust, a good fitting dust mask and latex gloves are essential, followed by showering after sanding. There will be dust all over the shop, unless you live in a climate and under conditions permitting sanding outdoors.
The surface after sanding with 80 grit is not ready for varnish, but I delay sanding to120 grit until just before varnishing. Epoxy will get on the outside of the hull here and there, not so much from glassing the inside, but from using thickened epoxy to glue the inwales and outwales on.
Doing the Inside
The outside of the hull has been fiberglassed and sanded. It is now a perfect pattern for cutting the cloth to shape for the inside.
Put the latex gloves back on and get the rest of the cloth out of the box. Unroll it over the outside of the hull, again being careful to keep it straight and the strands aligned parallel with the keel and at right angles to it, and handle it as little as possible. If you ordered enough for the one boat, there should not be much, if any, left over. Either cut the excess off the roll, or unroll the whole thing. Don't roll the excess up on the tube - there won't be enough of it to do another boat, so folding it here and saving it for patching and bias strips is acceptable. Save the tube for later.
Trim the cloth along the sheer as before, but leave two or three inches hanging over all along it. At the stems, trim it an inch or two short of the stem, with the cloth slit up to the inboard ends of the stems. It is advisable to have a gloved assistant now to help with the next step. Roll it on to the tube, keeping it flat, and avoid wrinkling it. Wrap the roll back in the paper wrapping it came in, and put it back in the box.
The cleanup of the inside of the hull is next. Scrape, fill, sand, cuss, etc. to get the inside ready for fiberglassing. The first order of business after the hull is turned right side up is to clean up the sheer. I like the 4-in-hand rasp, with both coarse and fine teeth, both on the flat and curved surfaces. The coarse teeth take most of the excess cured epoxy off, and the fine teeth gets down to near the wood. You can use a scraper to get the last of it, followed by a light sanding. The goal is to get the sheer edge smooth so that the inside fiberglass cloth doesn't hang up on it and cause pulls when you are laying it out.
Vacuum and wipe the inside of the hull as you did for the outside, and make sure it is perfectly dry before proceeding. If you choose to precoat, now is the time.
 Get
your assistant back, get some gloves on her, and unroll the cut cloth so that it
drops into the hull in position. Spring-type clothes pins are indispensable
at this point to hold the edges around the sheer. Leave the
clothes pins in place as you do the wet out. Use the wallpaper
smoothing brush to smooth out the cloth. You may have to adjust some of
the clothes pins while doing so. The easiest thing is to have the cloth
fill the boat with just a little bit pinned to the sheer. When you are smoothing
it, it won't tend to pull away from the opposite side, and adjusting the clothes
pins is easier.
Get
your assistant back, get some gloves on her, and unroll the cut cloth so that it
drops into the hull in position. Spring-type clothes pins are indispensable
at this point to hold the edges around the sheer. Leave the
clothes pins in place as you do the wet out. Use the wallpaper
smoothing brush to smooth out the cloth. You may have to adjust some of
the clothes pins while doing so. The easiest thing is to have the cloth
fill the boat with just a little bit pinned to the sheer. When you are smoothing
it, it won't tend to pull away from the opposite side, and adjusting the clothes
pins is easier.
Wetting out the inside is a little easier than the outside. Pour some mixed epoxy into the bottom, near the stem. Spread it around with a squeegee, using the brush to get the areas around the stem. Don't worry about the stems just yet. Complete the wet out as you did for the outside - squeegeeing, checking for runs, brushing them out, fixing bubbles, etc. It is really not significantly any different than doing the outside.
 The hardest area to get to come out nice is the inside stem area.
Sanding the wood is tough enough in here; sanding the epoxy smooth later is damn
near impossible. The picture to the left shows a thin flexible sanding
stick being used to sand the inside of a guideboat hull. This would
probably work on a canoe as well. Recall that the cloth was cut a bit short at the stems
when you trimmed it over the outside of the hull. If all went well, the
inside cloth will end just before it runs on to the inside stem, but you should
epoxy over any exposed bare wood, including the stems. There should be no
concern about glassing the inner stems - they got epoxied anyway, thereby
sealing them. If you feel you must cover the stems with fiberglass (not
recommended), cut some bias strips of cloth from the excess cloth left
over. Bias cloth is cut at 45° to the direction of the weave. When
you cut the cloth off the roll, it was cut across the weave. Imagine a
square piece of cloth, with the strands running horizontally and
vertically. The bias strip, about three or four inches wide, is cut from
one corner diagonally across the square to the opposite corner. Handle
this strip carefully - it can easily stretch to double its length. Keep
the strands at right angles. Lay it into the stem area, using a dry
bristle brush to poke it into position. Wet it out with the brush, trying
to keep it flat and solid against the inner stem. Check it often as it
cures, and push down any areas that pull away from the surface. Don't even
think about using a square-cut strip rather than a bias cut. It will be a
bigger headache than its worth, and will probably look terrible when it cures.
The hardest area to get to come out nice is the inside stem area.
Sanding the wood is tough enough in here; sanding the epoxy smooth later is damn
near impossible. The picture to the left shows a thin flexible sanding
stick being used to sand the inside of a guideboat hull. This would
probably work on a canoe as well. Recall that the cloth was cut a bit short at the stems
when you trimmed it over the outside of the hull. If all went well, the
inside cloth will end just before it runs on to the inside stem, but you should
epoxy over any exposed bare wood, including the stems. There should be no
concern about glassing the inner stems - they got epoxied anyway, thereby
sealing them. If you feel you must cover the stems with fiberglass (not
recommended), cut some bias strips of cloth from the excess cloth left
over. Bias cloth is cut at 45° to the direction of the weave. When
you cut the cloth off the roll, it was cut across the weave. Imagine a
square piece of cloth, with the strands running horizontally and
vertically. The bias strip, about three or four inches wide, is cut from
one corner diagonally across the square to the opposite corner. Handle
this strip carefully - it can easily stretch to double its length. Keep
the strands at right angles. Lay it into the stem area, using a dry
bristle brush to poke it into position. Wet it out with the brush, trying
to keep it flat and solid against the inner stem. Check it often as it
cures, and push down any areas that pull away from the surface. Don't even
think about using a square-cut strip rather than a bias cut. It will be a
bigger headache than its worth, and will probably look terrible when it cures.
The curing, rolling the fill coats, tipping off with the brush, and chasing runs and bubbles is the same as for the outside. When the wet out coat cures overnight, again trim the excess cloth from the sheer. The scraping and sanding steps apply to the inside also. When the epoxy is cured sufficiently for sanding, again sand with 80 grit, clean up, and get ready for the decks and trim.